Filling out an Iran visa application form is an easy, yet important step to get an Iran e visa. In this article, we’ll give you a thorough guide as well as useful tips on how to apply for Iran visa, when to apply for it, and the steps involved in filling out the visa application form.
When to apply for Iran visa?
It’s an important decision to make: How early should I apply for Iran visa? The answer depends on if you’re going to apply for the visa on your own or with the help of a visa agency.
If you want to apply on your own, you need to go directly through a consulate. In this case, you download and fill out the application form from the Iran consulate in your home country. Then, send the forms and the other required documents including your passport, photos, the money for visa fee and proof of your travel insurance to the embassy. As reported by many travelers and travel guides, this method can take from weeks to months. Then, if you’re lucky, you’ll be contacted by the result. Otherwise, you’ll need to contact them, which is not always easy. Considering all the uncertainty involved, if you dare to apply for Iran visa on your own, give yourself six weeks or longer to be sure you won’t need to reschedule your trip in the last minute.

Visa to Iran
However, if you decide to apply for Iran visa through an agency, which is the option we highly recommend, you don’t need to start the visa application process that early. In this case, we recommend you start the process of visa application two weeks ahead of your scheduled travel. Having that said, you need to know that if you’re applying for Iran visa through 1stquest, getting Iran visa won’t take that long. With 1stQuest, you’ll receive your authorization code in two working days. If you choose to collect your visa from the airport, you’re almost done and you’re ready to pack for the trip. If, on the other hand, you’ve chosen to collect your visa from the embassy/consulate, you need to have enough time to go to the embassy and collect it.

Tourists can get their Iran visa easily
Do you want to get your visa in 2 days without any hassle? 1stQuest will take care of all the process with best support. It`s cheap, easy and the chance of rejection is almost 0%.
How to fill Iran visa form?
Things you need to prepare before filling out the application
It doesn’t matter if you are filling out an application form using paper and pencil, using the Iranian Ministry of Foreign Affairs’ e visa online form, or filling out 1stQuest’s online application form, the only thing that matters is to provide the required information in an accurate yet simple way so that your visa application process doesn’t get a hiccup. What we explain here is how to fill Iran visa form through 1stQuest online application system which is very simple, efficient, and user-friendly.
Have all the following items prepared before you start filling out the application form:
- A digital copy of the first page (bio page) of your passport. This digital copy should be: either in .jpeg or .pdf format, in color, less than 500 kb in size, and fully readable. Needless to say, your passport should have at least 6 months validity and two blank pages for the time you want to collect your visa.
- A digital copy of your personal photo which should be: in .jpeg format, in color, less than 500 kb in size, and in a white background.

Iran visa application form
How to fill out the Iran visa form?
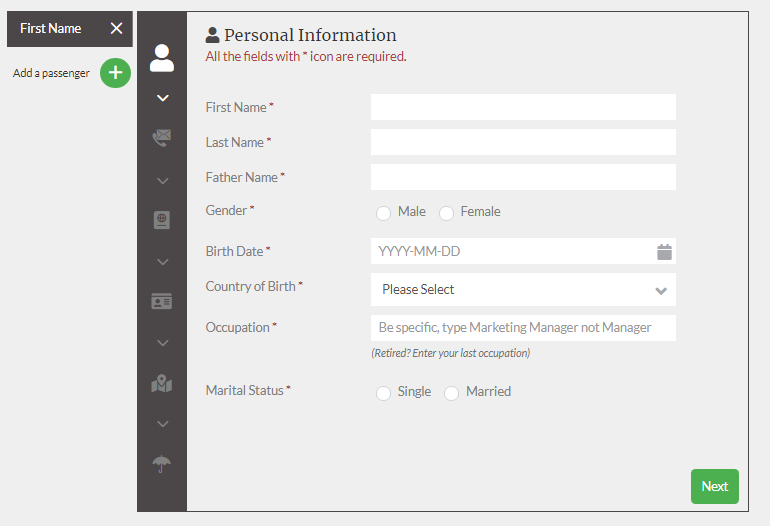
- In the first step, you fill out your bio information including your name, gender, birthdate, country of birth, marital status, and your occupation. The most important field in this page is your occupation. While you shouldn’t lie about your occupation, you need to know that some people like students, teachers, nurses, and data-entry clerks are more welcome than people with the jobs which might seem sensible to the MFA officials. While there are no hard and fast rules, experience has shown that journalists, military personnel, and bloggers are always on the radar of the MFA officers. Also, be aware that the MFA might Google your name. In case you’re retired, you can simply write the name of your last occupation. if you want to know more about Iran visa requirements, check out this article: What are Iran visa requirements?
- In the second step, you’ll be required to provide your contact details: email, phone number, and address. Just like the occupation field, your email can be a bit tricky. In general, we recommend you give your generic emails like your Gmail rather than .gov or institutional accounts.
- In the next step, you’ll be asked to provide your passport information including your nationality, passport number, and its issue and expiry date. If you have a former (previous) nationality, you need to enter it, but if you don’t have a former nationality, just leave the field unanswered.
- In the fourth step, you will upload the digital copy of your personal photo and passport. In the following fields, you can simply click on the blank space to choose a file to upload or drag and drop your file into it. Just take a look at the sample photo and passport scan to make sure you’re uploading the right type of file. One of the most frequent questions about the photo for Iran visa is that whether women need to wear hijab or not. Well, our experience with thousands of successful visa applications tell us that ladies do not need to cover their hair in the photo they’re using to apply for the Iran e visa.

Iran visa application form
In this step, you’ll be asked to provide your trip details. First off, you’ll write the estimated time of your arrival and the estimated time of your exit. Don’t panic, this is just an estimated calculation. You can enter Iran up to 3 months from the issue date of your visa, and you can change your itinerary later on. One point to remember is that if you want a 30-day visa, you need to enter the arrival and exit date in a 30-day interval. Also, keep in mind that Iran tourist visa is a 30-day single entry visa. But, you can extend it in Iran for 30 days for the first time and another 30 days for the second time.

Passport information form
There’s another important field in this step which asks you about visa collection point. This is the place where you collect your visa. In fact, after you submitted your application, 1stQuest will do the paperwork and you’ll receive the authorization code via email in 2 business days. An authorization code (also spelled as an authorization code or called reference code) is the electronic receipt for your visa. Receiving this code means that your visa is ready and you just need to collect it. Therefore, it is important to choose a place to collect your visa which is convenient for you. The best choice you’ll have is to collect your visa at an international airport in Iran depending on your point of entry. Now you have the choice of collection your visa from nine major international airports in Iran and Shahid Bahonar sea border in Bandar Abbas. You can also choose one embassy or consulate listed in the drop-down menu to collect your visa from. Finally, you’ll also need to select the exit point based on your itinerary, which again can be changed later on.

Upload your documents form
- The last step in filling out the Iran visa application form would be selecting if you want to purchase a travel insurance. In fact, there are two reasons for having travel insurance for traveling to Iran; First, travel insurance is mandatory by the MFA to collect your Iran visa; without having a printout of your valid insurance, you can’t collect your visa from the embassy or the visa office at the airport. Second, you don’t want the unexpected mishaps to ruin your long-awaited trip. A good travel insurance can protect you against mishaps and cover many unexpected and exorbitant costs. To learn more about the travel insurance, visit our page on Iran visa insurance.

Extra services form
When you finished filling out in all the fields, you’re ready to apply for Iran visa. Just don’t forget to check the final checkbox in which you approve the accuracy of the information you entered. In addition, if you’re traveling with someone else and you wish to apply for Iran visa on the behalf of them, you can simply click on “Add a Passenger” button on the top left corner of the field and enter the information required for them just like you did for yourself. After you click on the “Apply” button, if there is missing information, you’ll be notified to provide the accurate information needed. When everything is Ok, your information will be sent to our secure servers and you’ll be redirected to secure payment pages where you can pay for the service fee with your Visa or Mastercard. Finally, when the payment is done, you’ll receive a confirmation email which assures you we have received your application and we’ll start processing your visa very quickly.
This is the moment where you can rest aside and wait for two business days to receive your authorization code and begin packing.
For more information about Iran visa tracking, check out this article: Iran visa status
Feeling confused? Do you want to get your visa in 2 days without any hassle? 1stQuest will take care of all the process with best support. It`s cheap, easy and the chance of rejection is almost 0%.

